JWT Authentication in Node.js Explained Simply
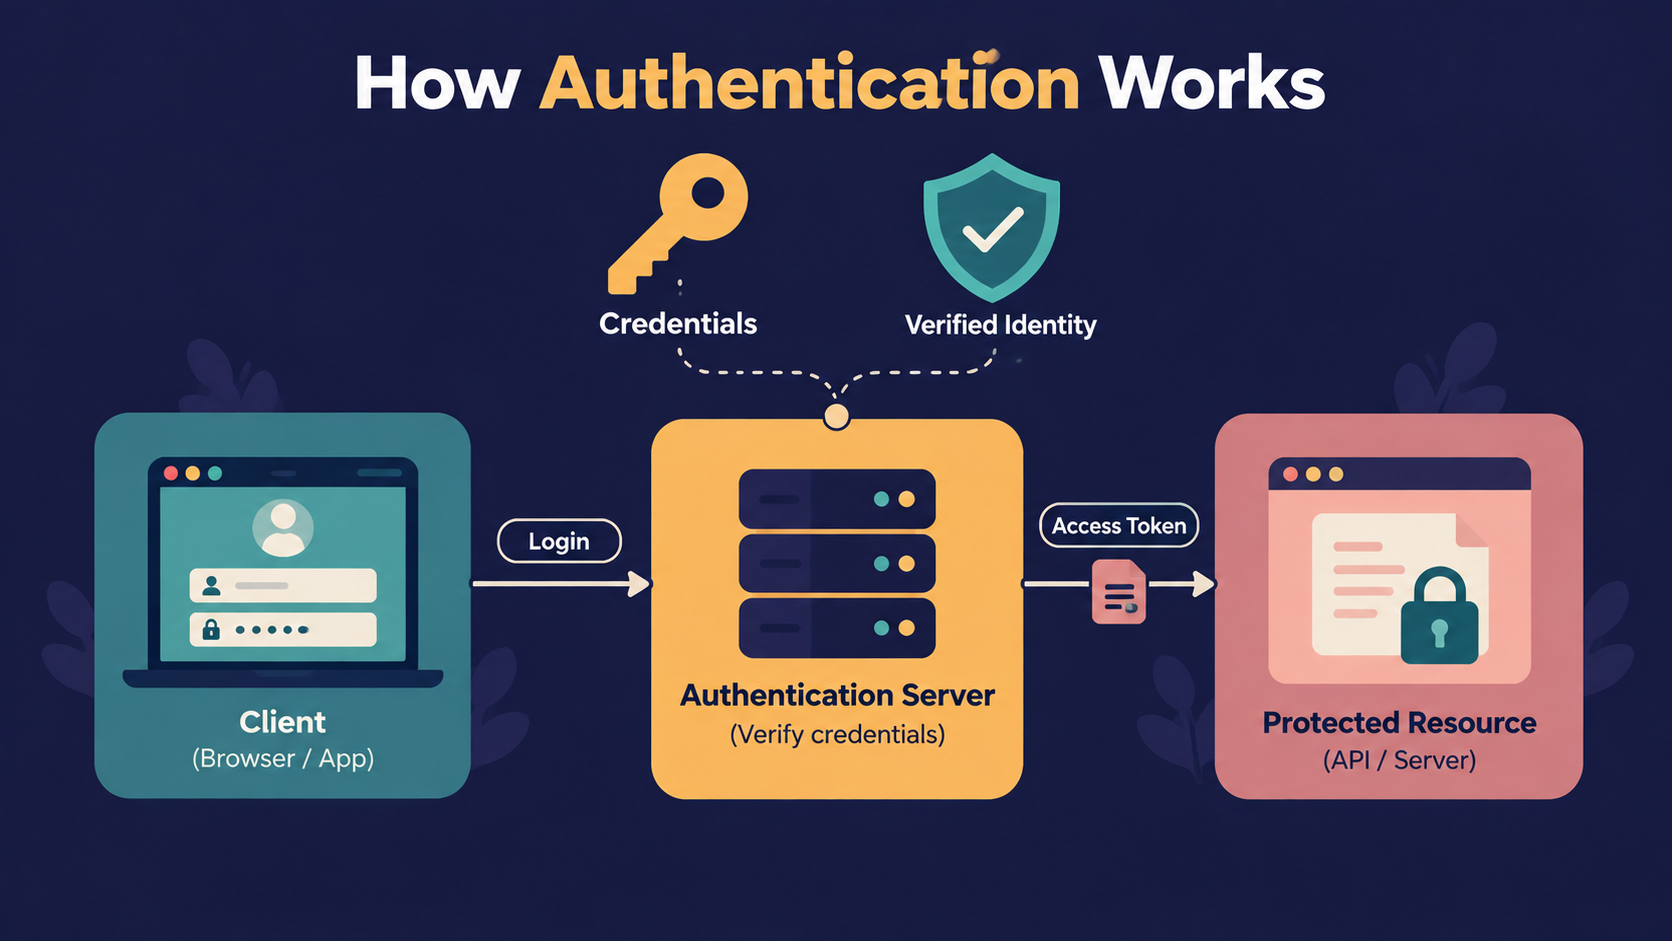
How does a server know who you are on every request?
Many beginners think the server remembers them after login. That's not true.
HTTP is stateless. Every request arrives like a stranger, with no memory of the last one.
So how does /profile know it is you and not someone else? That is the problem authentication solves.
Authentication means proving who you are before the server lets you in.
Without it, anyone could read your data, edit your account, or delete your orders. Every real app needs it.
After knowing why we need authentication, the next question is: what do we hand the user after login so the server can recognise them again? That answer is a JWT.
What is a JWT?
A JWT (JSON Web Token) is a small, signed piece of text that the server gives you after login.
A JWT is a signed token that carries your identity, so the server can verify you without storing anything.
Analogy: The College Fest Entry Pass
Imagine your college fest. You register once at the desk and get an entry pass.
After that, you never go back to the desk. You just show the pass at every gate.
Registration desk = login route
Entry pass = JWT
Details printed on the pass = payload
Official hologram stamp = signature
Gate guard = middleware
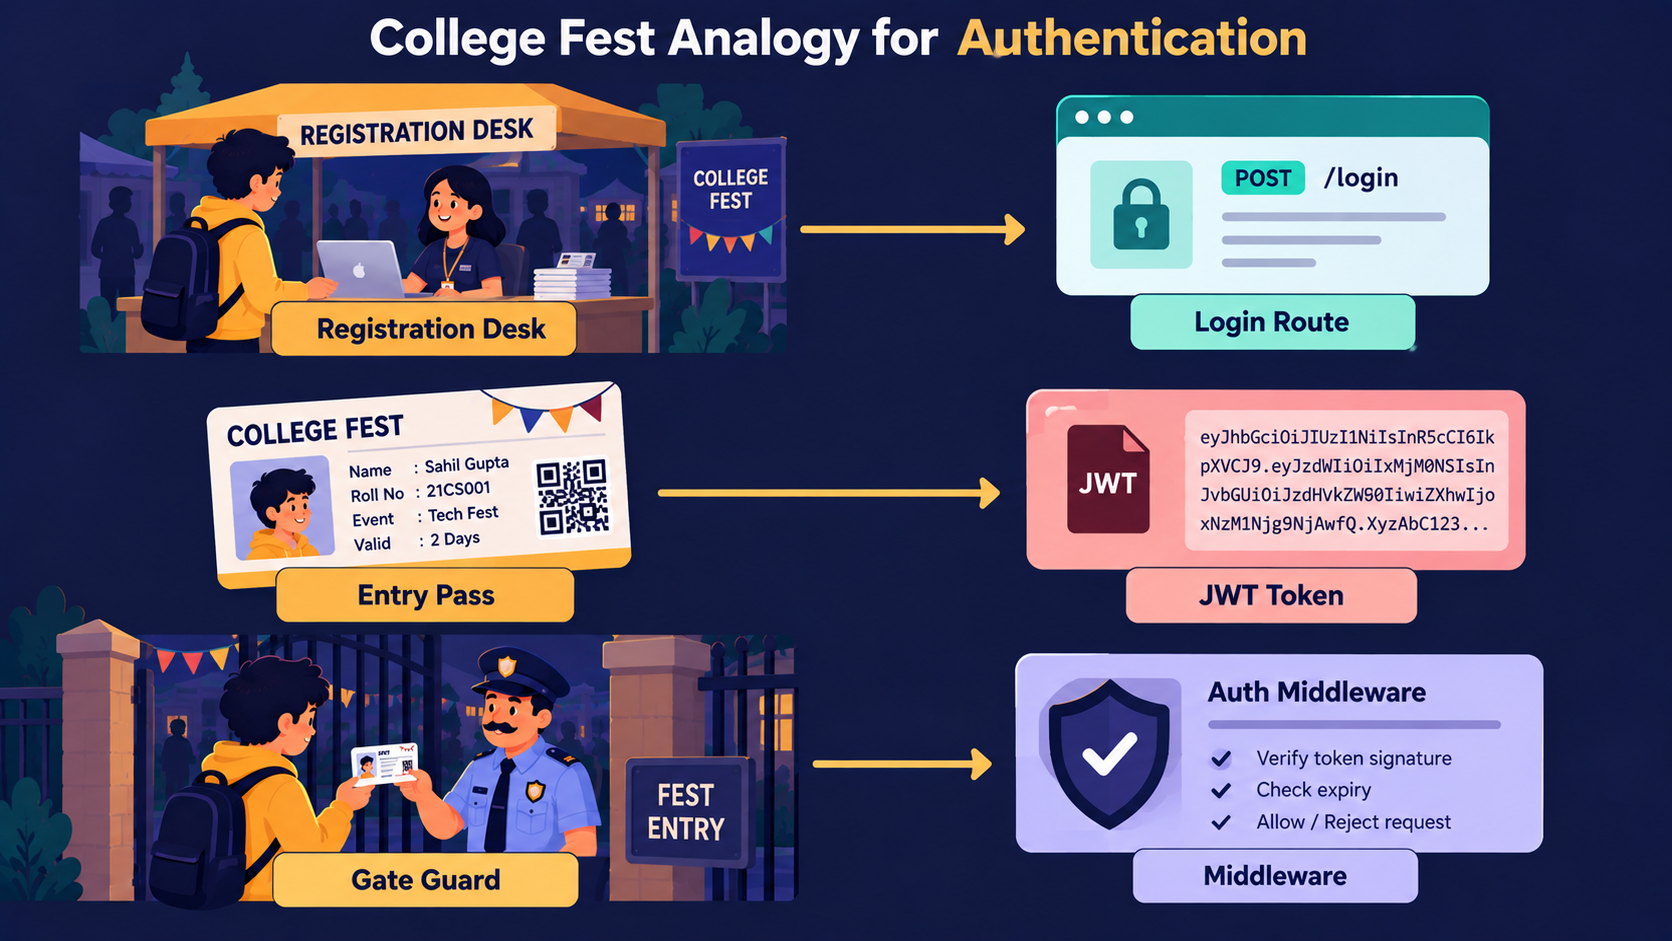
This is stateless authentication. The guard does not phone the desk to ask who you are.
He only checks that the stamp is real. The server does the same: it keeps no session list in memory.
Note: Why stateless matters
With sessions, the server stores every logged-in user. With JWT, the token itself carries the proof.
That makes JWT easy to scale across many servers. The next section opens the pass and shows what is printed on it.
What is inside a JWT?
A JWT looks like random text, but it has exactly three parts separated by dots.
xxxxx.yyyyy.zzzzz
header.payload.signature
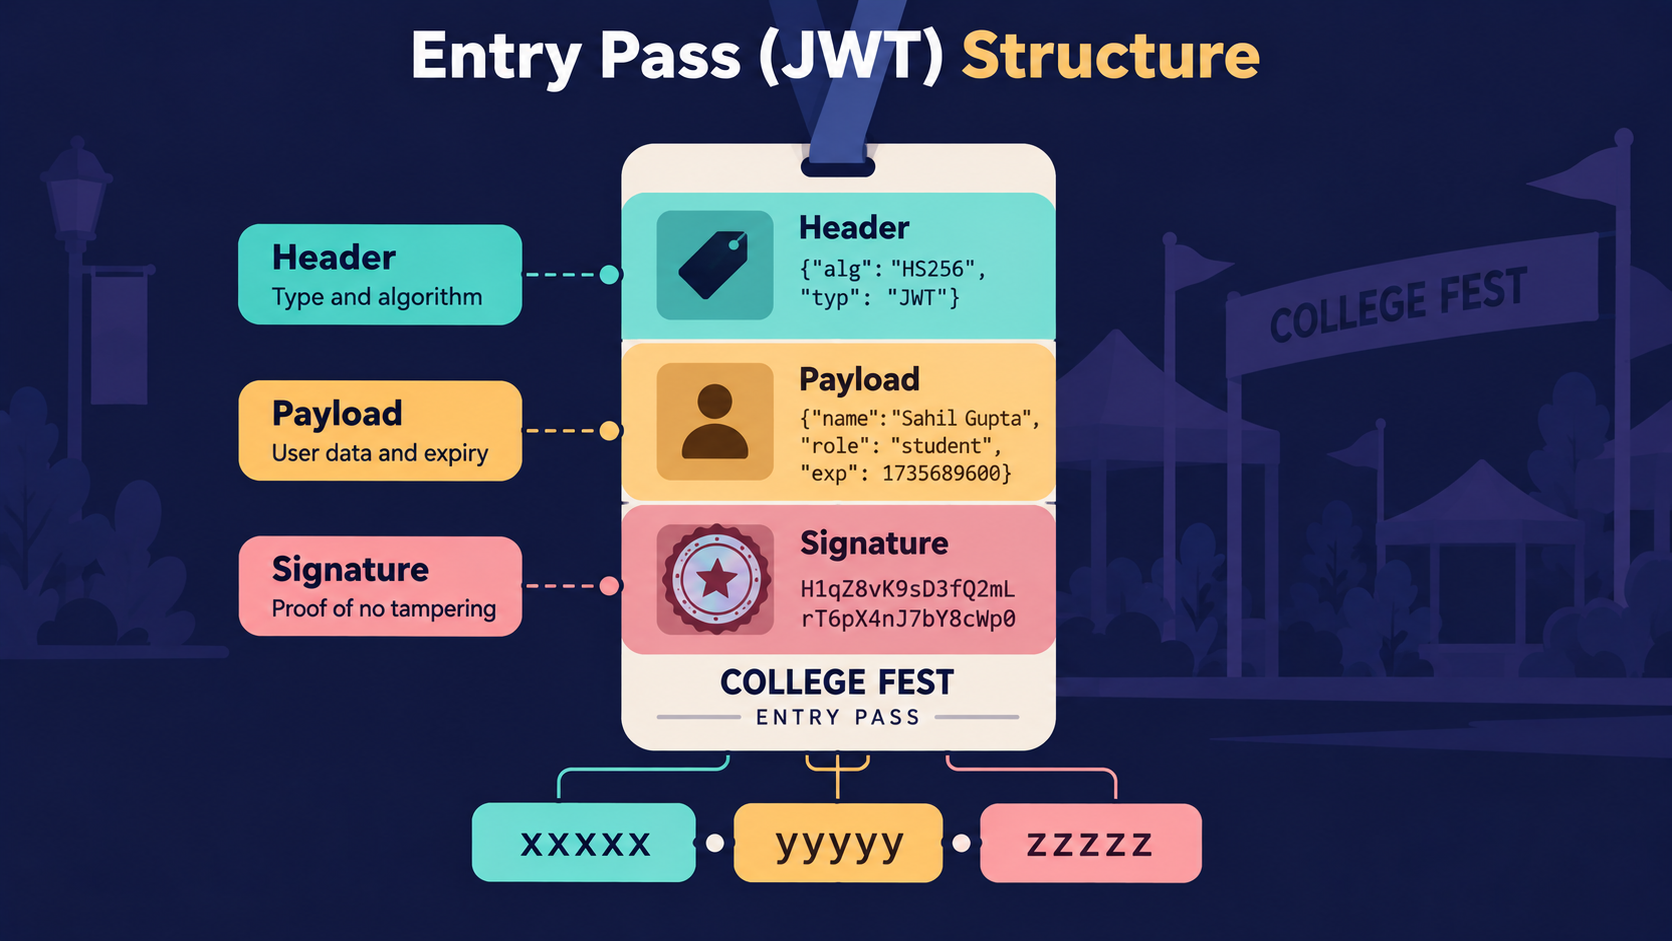
| Part | What it holds | On the fest pass |
|---|---|---|
| Header | Token type and signing algorithm | Type of pass (student, guest) |
| Payload | Data about the user, like id and role | Name and role printed on it |
| Signature | Proof nobody changed the token | Official hologram stamp |
Here is a decoded example:
// Header
{ "alg": "HS256", "typ": "JWT" }

// Payload
{ "id": 1, "role": "student" }

// Signature
JWT_SECRET = "my-jwt-secret-key"
The signature is made from the header, the payload and a secret key that only your server knows. We skip the maths here. Confidence comes first.
Important Rule: The payload is not secret
The payload is only encoded, not encrypted. Anyone can read it.
Never put passwords or card numbers inside. The signature stops people from changing the token, not from reading it.
How does login work with JWT?
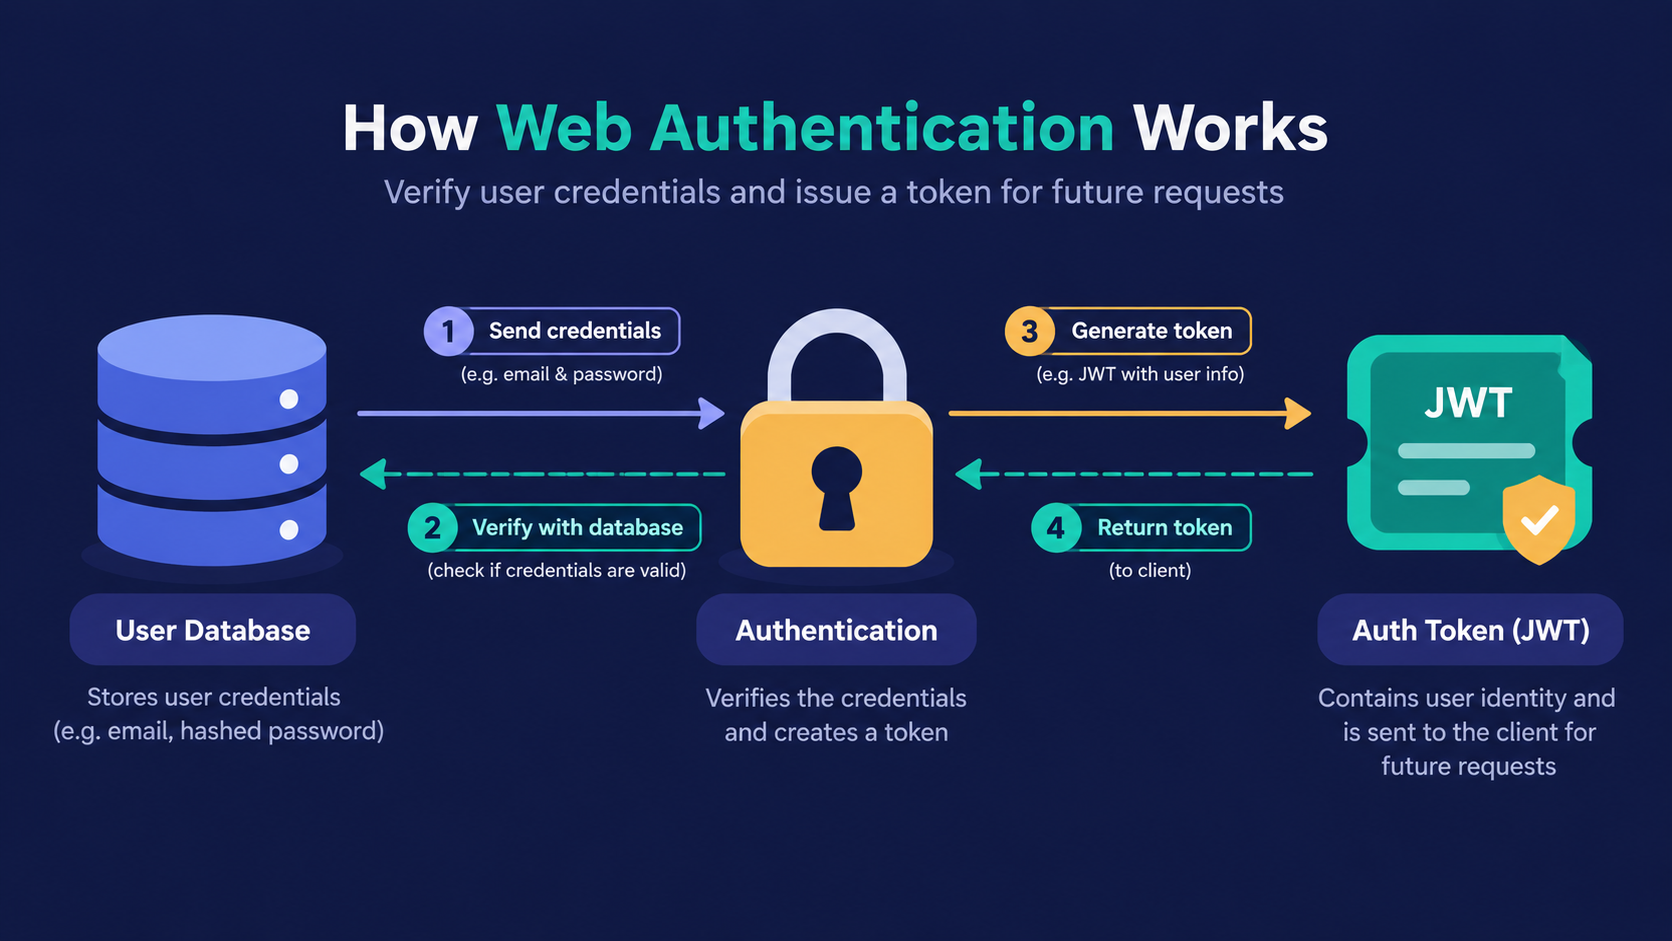
After knowing what a JWT contains, the next question is: who creates it, and when? The server creates it at login.
Analogy: The Registration Desk
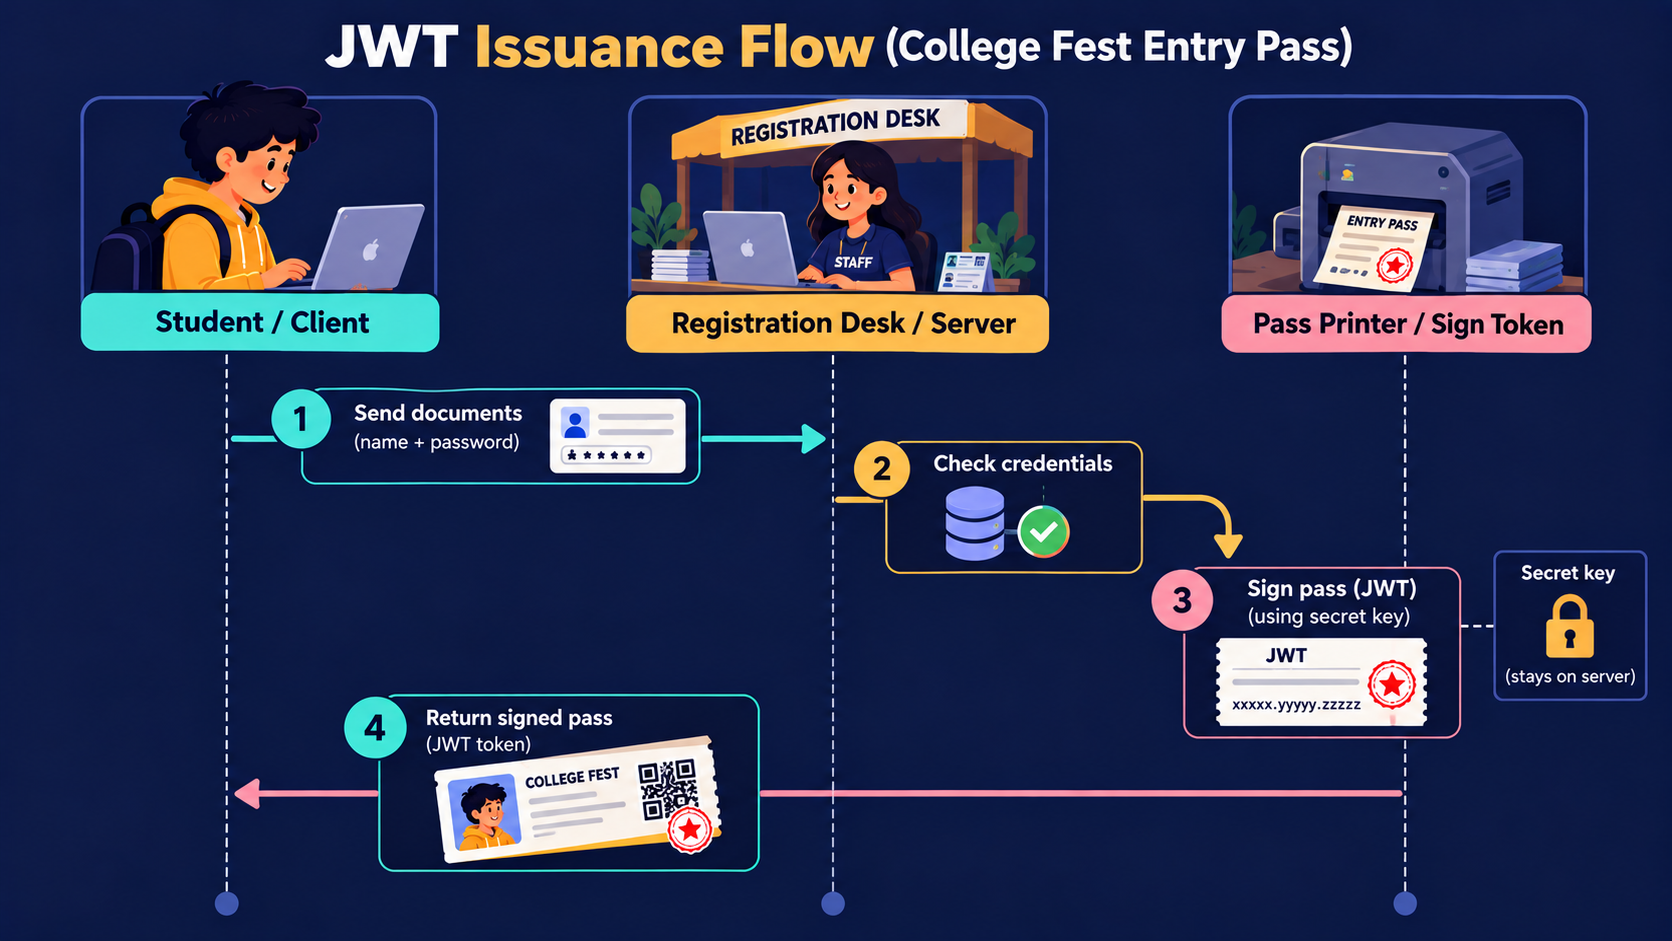
At the desk, you show your documents once. If they are correct, the desk prints your pass and stamps it.
Our login route does the same:
The user sends a name and a password.
The server checks them.
If correct, the server signs a JWT with its secret key.
The server sends the token back.
The client keeps the token for later requests.
Install the packages first:
npm install express jsonwebtoken dotenv
Create a .env file with a long random secret:
JWT_SECRET=put-a-long-random-string-here
Now the login route in server.js:
// Do the Change in package.json file, type="module"

import "dotenv/config";
import express from "express";
import jwt from "jsonwebtoken";

const app = express();

// express.json is middleware used to parse incoming HTTP JSON request to convert into Javascript object.
app.use(express.json());

// Demo user only. Real apps store hashed passwords in a database.
const user = {
    id: 1,
    name: "Sahil",
    role: "student",
    password: "chai123"
};

app.post("/login", (req, res) => {
    const { name, password } = req.body;

    if (name !== user.name || password !== user.password) {
        return res.status(401).json({
            error: {
                message: "Invalid credentials"
            }
        });
    }

    const token = jwt.sign(
        { id: user.id, role: user.role },
        process.env.JWT_SECRET,
        { expiresIn: "15m" }
    );

    res.json({ token });
});
expiresIn is important. A pass that never expires is dangerous if someone steals it.
How do we send the token with every request?
Getting the pass is only half the story. You must also show it at every gate.
The standard way is the Authorization header, with the word Bearer before the token:
Authorization: Bearer <your-token>
Try it in Postman. First, log in:
1. Open Postman and click New → HTTP Request.

2. Set the method to POST and the URL to http://localhost:8080/login.

3. Open the Body tab and select raw.

4. Choose JSON from the dropdown on the right.

5. Paste this body:

    json

    {
        "name": "Sahil",
        "password": "chai123"
    }

6. Click Send.

7. You will get Token in this format: eyJhbGciOiJIUzI1NiIsInR5cCI6IkpXVCJ9.eyJpZCI6MSwicm9sZSI6InN0dWRlbnQifQ.QS45CqzzXwndQUcxI3XdYncvIWjrfwk4c7Z_m84A5I0
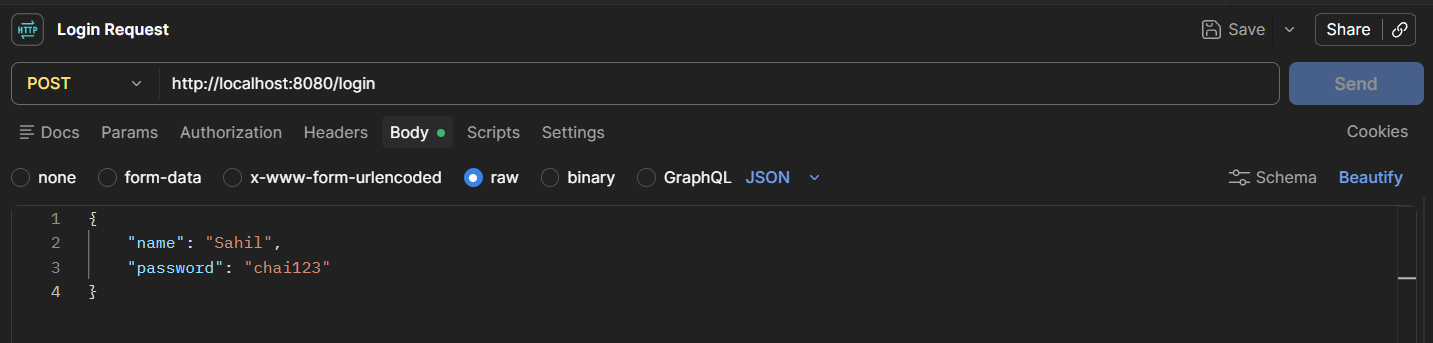
The response body contains your token. Copy it, because you will use it in the next section.
After the client sends the token, the next question is: who checks it? That is the job of middleware.
How do we protect routes using tokens?
Analogy: The Gate Guard
The guard stands at the gate and checks every pass before you enter.
Is there a pass at all?
Is the hologram stamp real?
Has the pass expired?
If any answer is no, the guard stops you. Otherwise, you walk in.
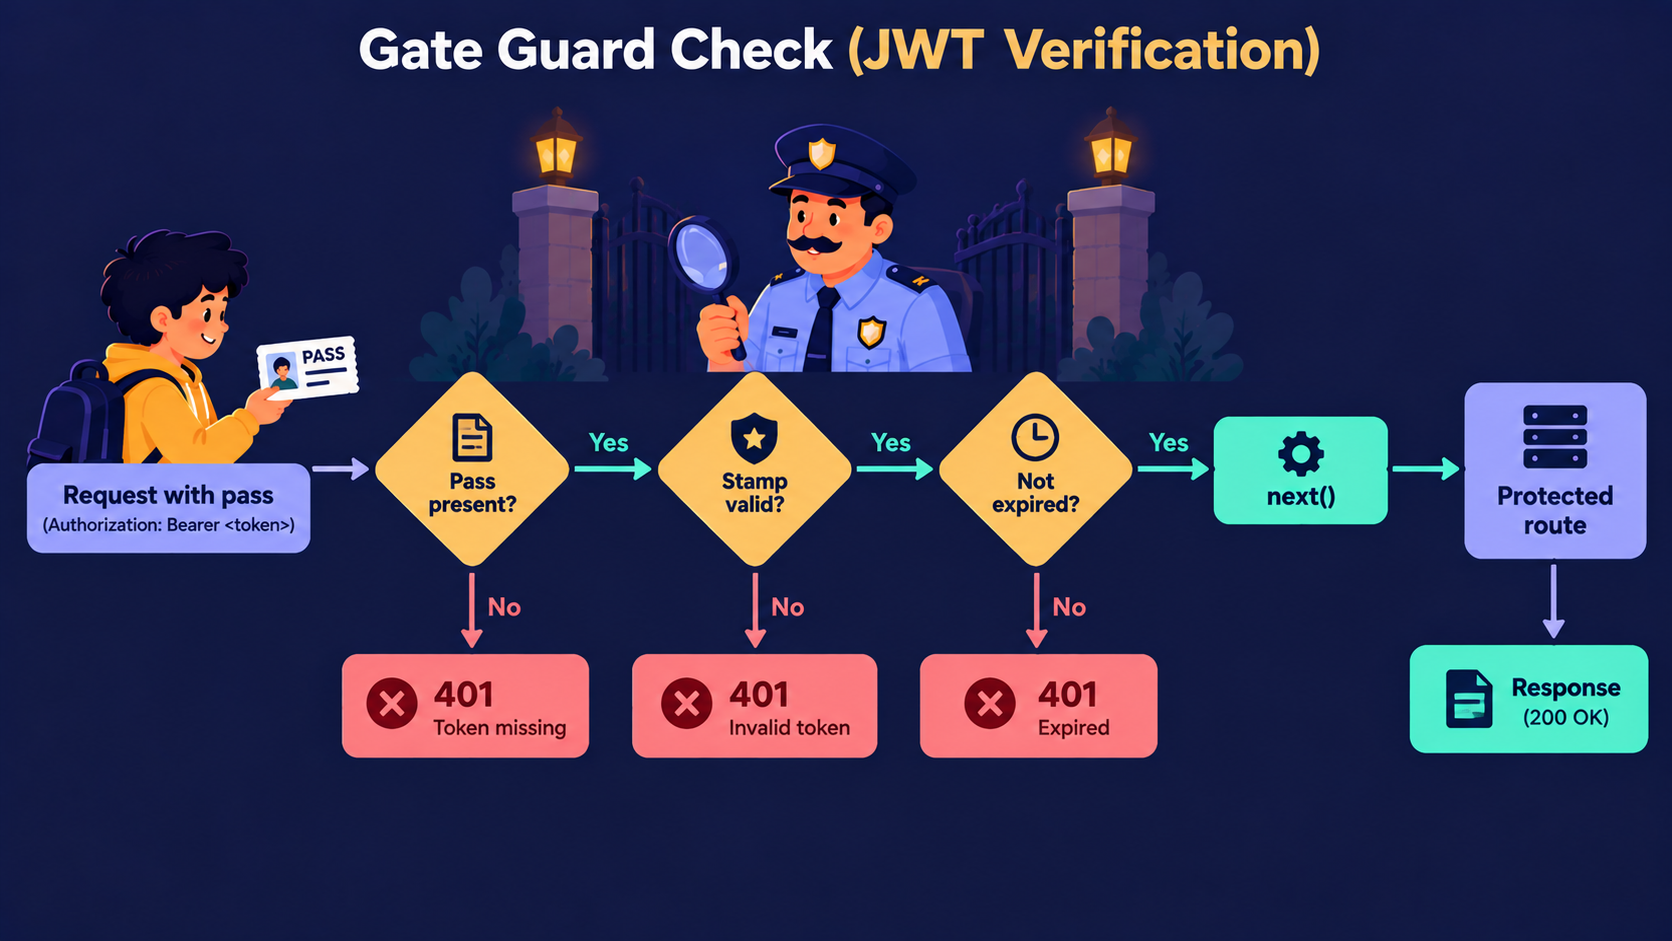
In Express, the guard is a middleware function:
function verifyToken(req, res, next) {
    const header = req.headers.authorization;

    if (!header || !header.startsWith("Bearer ")) {
        return res.status(401).json({
            error: {
                message: "Token missing"
            }
        });
    }

    const token = header.split(" ")[1];

    try {
        const user = jwt.verify(token, process.env.JWT_SECRET);

        req.user = user;
        next();
    } catch (err) {
        res.status(401).json({
            error: {
                message: "Invalid or expired token"
            }
        });
    }
}

app.get("/profile", verifyToken, (req, res) => {
    res.json({ message: `Welcome, user ${req.user.id}`, role: req.user.role });
});

app.listen(8080, () => console.log("Server running on port 8080"));
jwt.verify re-creates the stamp using your secret and compares it. If anything was edited, it throws an error.
Now call the protected route in Postman:
1. Create another request. Set the method to GET and the URL to http://localhost:8080/profile.

2. Open the Authorization tab.

3. Choose Bearer Token from the Type dropdown.

4. Paste your token into the Token field.

5. Click Send.
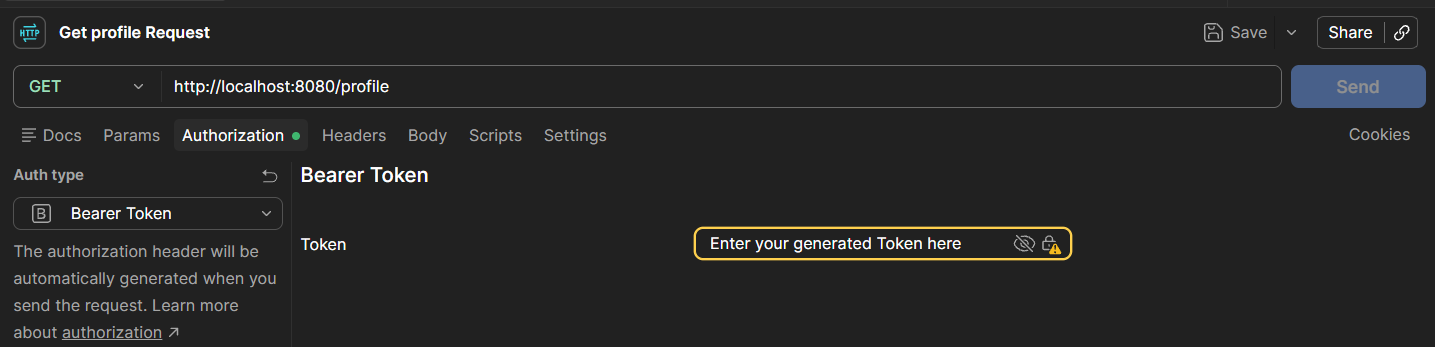
Postman builds the Authorization: Bearer header for you. You can also see it in the Headers tab.
Now set the Type to No Auth and send again. You get 401 Token missing. That is your route, protected.
How do all these pieces work together?
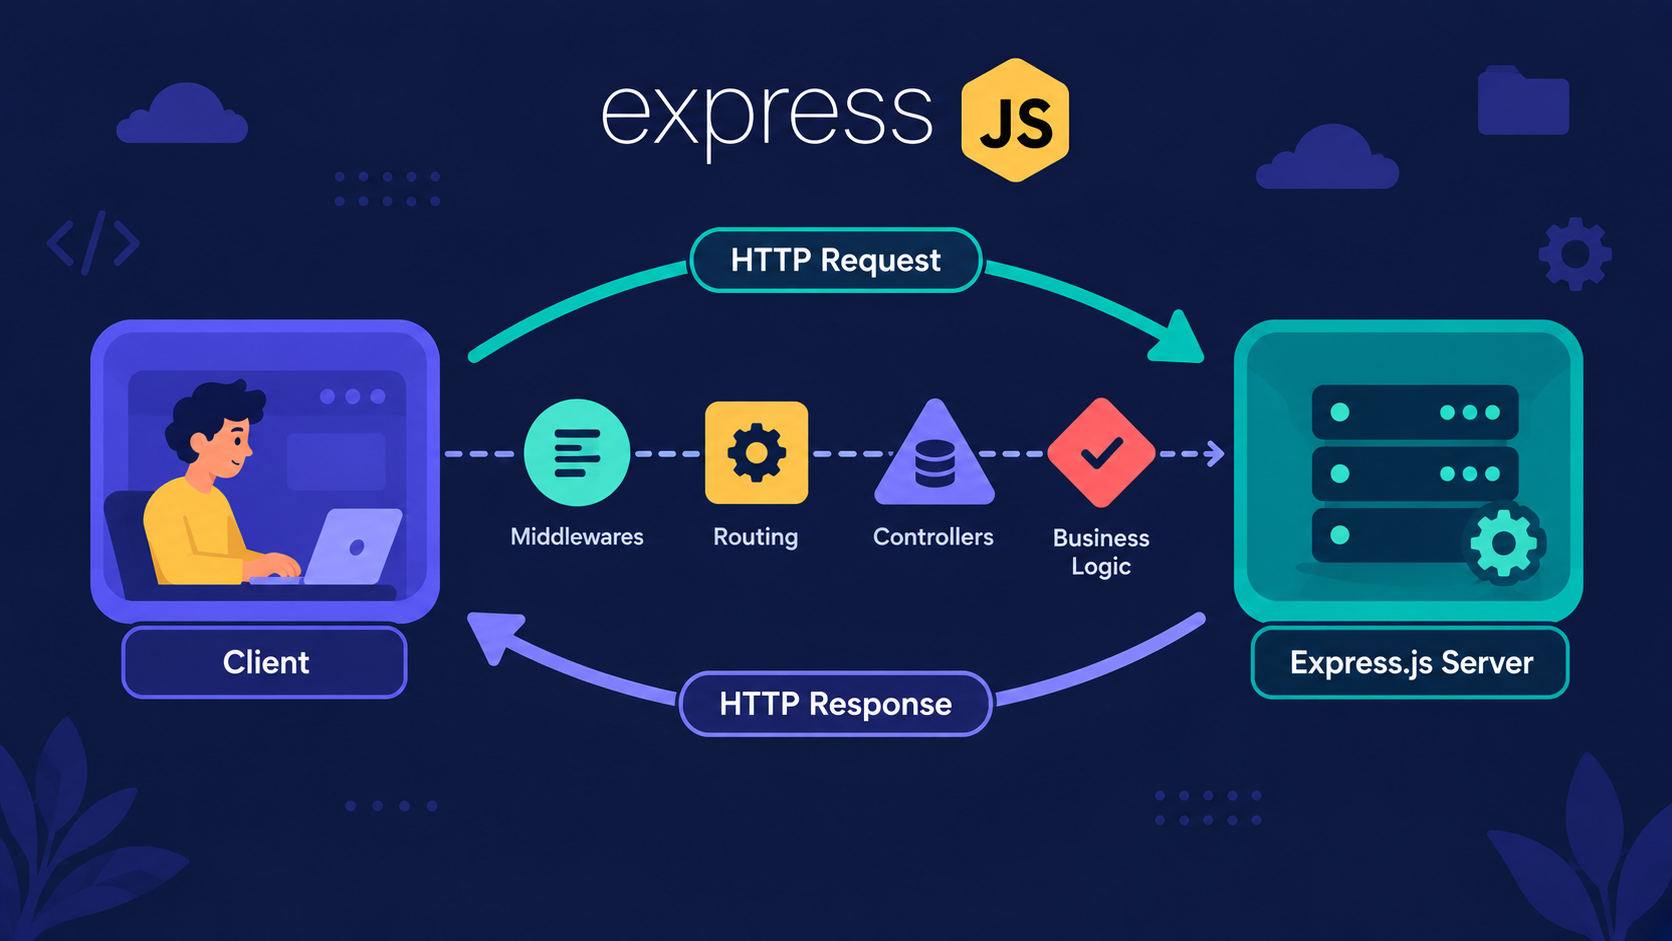
Now let us join everything in one flow.
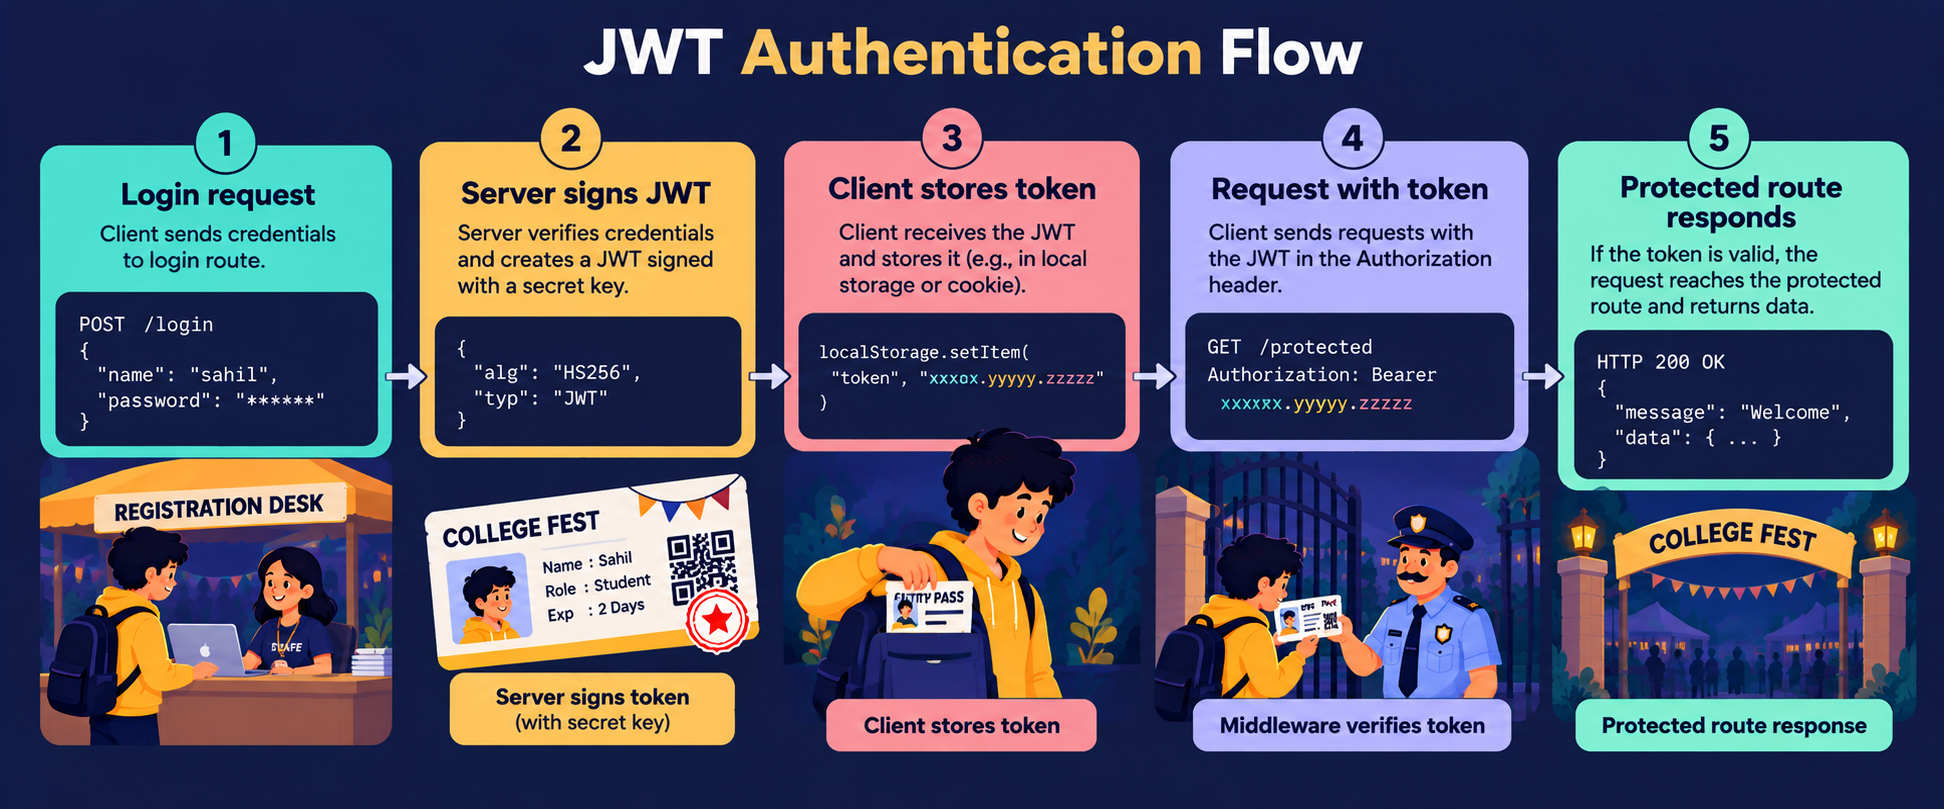
| Step | What happens | Fest analogy |
|---|---|---|
| 1 | Client sends credentials to /login |
Show documents at the desk |
| 2 | Server signs and returns a JWT | Desk stamps your pass |
| 3 | Client sends the token in the header | Show the pass at the gate |
| 4 | Middleware verifies the token | Guard checks the stamp |
| 5 | Route runs and sends data | You enter the fest |
The server never stored a session. The token carried the proof the whole time.
Hands-on assignment: watch a token expire
Change expiresIn to "10s" in the login route. Log in, call /profile straight away, then call it again after 15 seconds. What do you see?
Solution:
The first call returns 200 with your profile. The second returns 401 Invalid or expired token, because jwt.verify rejects any token past its exp time.
Conclusion
Authentication proves who you are before the server trusts you.
A JWT is a signed token that carries your identity.
The header, payload and signature describe, carry and protect the token.
Login creates the token, and the client sends it in the
Authorizationheader.Middleware verifies the token and protects your routes.
If this felt like a lot, that is okay. What matters is understanding the flow: login, token, header, verify.
What's Next?
Our demo stored a plain-text password, which no real app should do. In the next article, we fix that with password hashing, then look at roles, OAuth and OpenID Connect. The question: how do we keep an app safe when real users trust it?
If you found this useful, drop a comment or a reaction.